

 Heather Blackmon
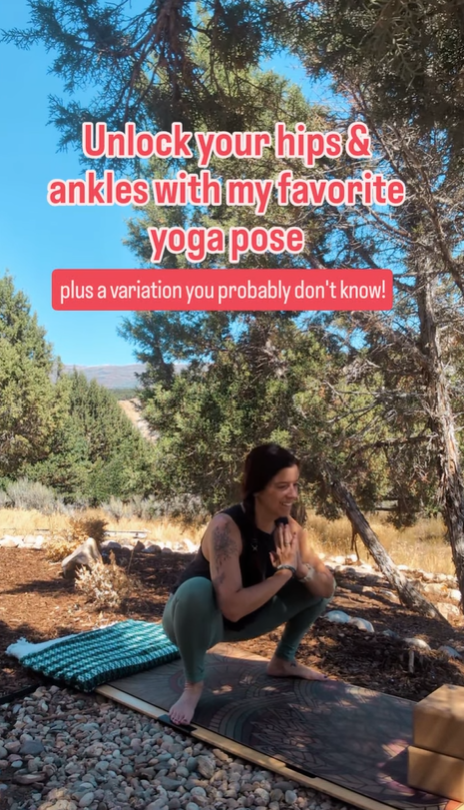
If I could only pick one pose to include in every yoga practice, it would be malasana (yogi squat).
This simple-looking posture is often overlooked, but it’s a very effective pose to improve mobility, strength, and stability in your lower body. Plus, it’s versatile enough to practice almost anywhere, from your yoga mat to your living room floor while watching TV.
In this post, we’ll cover what malasana is, why it matters, how to practice it (with variations), and how often you really need yoga to see results.
What Is Malasana (Yogi Squat)?
Malasana is often called “yogi squat.” It’s a natural resting position in many cultures around the world, though in the West it may feel unfamiliar if you spend most of your day sitting in chairs.
The most common way to practice malasana in the West is with feet a little wider than the hips, heels down if possible, and knees pointing outward.
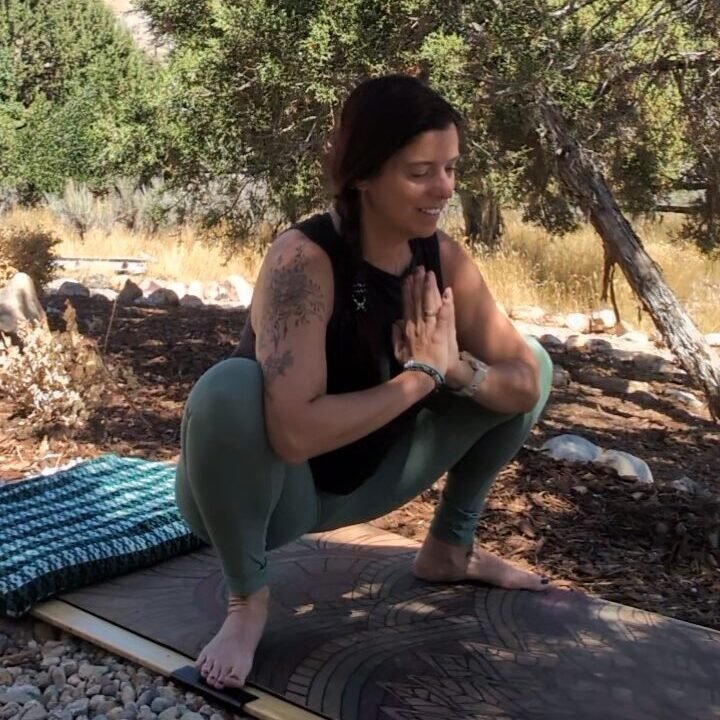
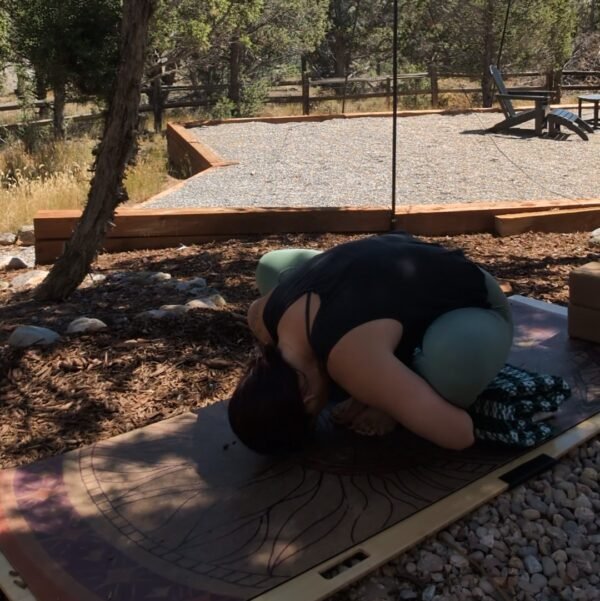
But the traditional variation of malasana looks different: feet together, knees wide apart, and the torso lowering between the thighs. This version requires significant ankle mobility, so it’s helpful to place a folded blanket under your heels if they don’t naturally reach the floor.
Both versions are valuable, and practicing them regularly can transform how your body feels in everyday life.
Benefits of Malasana
Malasana may look simple, but it delivers powerful benefits for your body and mind. Here are some of the top reasons to add it to your practice:
- Hip mobility: Helps release tight hips, making movements like squats, lunges, and even sitting cross-legged easier.
- Ankle mobility: Strengthens and stretches the ankles for better balance and athletic performance.
- Low back relief: Provides a gentle stretch for the spine and pelvis.
- Inner thigh and groin stretch: Opens the muscles that often tighten from sitting or running.
- Digestive support: Traditionally used to stimulate digestion and elimination.
- Grounding effect: The deep, rooted position has a calming, centering quality.
- Performance boost: Improves movement patterns for runners, cyclists, and anyone who lifts weights.
How to Practice Malasana
Here’s a step-by-step guide to practicing malasana:
- Start standing with your feet hip-width or wider.
- Bend your knees and sink your hips down toward a squat.
- Keep your chest lifted and bring your hands to prayer at your heart.
- Press your elbows gently into the insides of your knees to encourage them open.
- Root down through your heels as much as possible, keeping your spine long.
Variations to try:
- Feet wider (Western version): A bit more accessible for most bodies.
- Feet together (traditional version): Knees wide apart, torso between thighs. Place a folded blanket under your heels for support if needed.
- Use props: Sit on a block if your hips don’t lower comfortably. Use a strap around the thighs to support the knees.
You can watch a video demo of both variations in this instagram reel:
Tips to avoid common mistakes:
- Don’t let your heels lift excessively. Elevate them with a blanket instead.
- Keep your chest lifted rather than collapsing forward.
- Focus on control, not just depth.
When and Where to Add Malasana
The beauty of malasana is its versatility. You can practice it:
- At the start of a yoga flow as a hip opener.
- During sun salutations, after the upward salute (Urdhva Hastasana) and before half lift (Ardha Uttanasana)
- During cooldown after running, cycling, or strength training.
- As a mid-day mobility break at your desk.
- While watching TV or reading.
This pose isn’t limited to your mat. It’s a natural position you can weave into daily life. The wider your stance, the more accessible for most people – so feel free to adjust and see your progress over time.
Explore Both Versions of Malasana
Curious to experience the difference between wide-stance and feet-together malasana? I created a 30-Minute Malasana Two Ways Class inside Outflow Studio that dives deep into both versions.
It’s just one example of how we explore yoga postures creatively in shorter formats, making it easy to fit practice into your schedule at home, even on busy days. If you’re not a member yet, you can join for only $15 a month!
How Often Do You Need Yoga to See Results?
A common misconception is that you need to practice yoga every single day to see benefits. The truth? You don’t.
Just 2–3 times per week is enough to start noticing improvements in strength, flexibility, and recovery. The length of your practice matters far less than showing up consistently over time.
So whether you drop into malasana for a few breaths each day or include it in two or three full practices a week, you’ll see progress.
Malasana in Action
Want to see malasana in motion with alignment tips? Watch my quick demo here: Malasana Reel on Instagram.
Quick Wins from Malasana
Not sure where to start? Try setting mini goals like:
- Sitting in malasana for 30–60 seconds.
- Practicing the traditional variation with heels supported.
- Transitioning from malasana into crow pose.
- Adding a gentle twist while in squat.
These small goals keep your practice fun and motivating.
Why Malasana Matters
Malasana is more than just a squat. It’s a posture that opens, grounds, and strengthens your body in ways that carry over into daily life.
If you’re looking for one pose that delivers maximum benefits, this is it. Add malasana into your next practice and notice how much better your body feels.
Next Steps
- Try malasana today, even just for a few breaths.
- Explore both versions in the 30-Minute Malasana Two Ways Class inside Outflow Studio. You can join the studio here for only $15 a month to access this and 100+ other yoga classes.
- If you’re new to yoga, check out Yoga Basics in a Box for a structured way to build consistency.


